Friday, October 29, 2010

Etceteras: haunted birdhouse

It’s finally here. All the little ghosts, goblins and witches will be out and about this weekend getting enough candy to last a year. And I’m ready for them.

For my last Halloween post of this year, I made a birdhouse.

I found this unfinished wood birdhouse in the dollar bin at the craft store. I really had plans to paint it in bright colors, decorate it and enjoy a pretty birdhouse. But the Halloween obsession got the best of me…

My birdhouse has become haunted.

I spray painted the wood in a metallic black and used dead leaves on the roof.

A little Spanish moss and more dead foliage and no bird would dare enter this house.

Happy Halloween to all.


Thursday, October 28, 2010

Sew and Tell: fabric and button acorns

I’ve been obsessed with acorns since the beginning of fall. I’ve been looking around but I couldn’t find any locally. I would love to fill a bowl or make a wreath clustered with acorns. Until then...

These little fabric acorns will have to do. I used the pumpkin tutorial that I posted about a few weeks ago but made them much smaller.

For the acorn cap, I used brown buttons and twigs for the stem.

I’m still hoping to find some real acorns – hopefully before the squirrels hide them all.


Visit thecsiproject.com

Wednesday, October 27, 2010

Etceteras: halloween bunting

I took this picture of a crow in my backyard. I really don’t like crows but I hear that they’re very smart. Which is probably why they deliberately mess on my car and smirk at my dog when she barks at them.

But this guy was just sitting there on the telephone wire so I snapped the photo. Now that it’s Halloween, my crow photo can come in handy. With some simple photo editing, I cropped in on Mr. Crow and played around with the color.
 

And here’s what I ended up with - Mr. Crow has become The Raven.
With a little help from Edgar Allen Poe and my raven, I created Halloween bunting.


Take that Mr. Crow!

Tuesday, October 26, 2010

Sew and Tell: knitting for hospital babies

I love to knit. But for some reason about two years ago, I put down my knitting needles mid-K1-P1 and haven’t picked them up since.

These baby items were made by my mother. She volunteers at the local hospital where all newborns receive a hat and pair of booties. The hospital provides the yarn, which is prewashed and the volunteers knit like crazy to keep up with the demand.


Who can resist these adorable, tiny baby items? So, if you like to knit and have made enough scarves to last a lifetime, check with your local hospital to see if they have a newborn knitting program.

What a great incentive for me to get out my knitting needles again.

Monday, October 25, 2010

Inkling: mini photo album

Creating a photo album has been on my list for awhile now but I just hadn’t gotten around to making one. Then I saw the most beautiful baby book featured on The Stationery Place. It was made for Lyndsey’s adorable new baby and it certainly raises the bar in the baby book category.


The Stationery Place
Since this is a new type of project for me, I started small – very small - and created a mini photo album.

I decided for my first album I wouldn’t attempt folded or accordion pages but use a simple approach.

Here’s how I made my mini album:


Materials:
  • Paper – I used scraps and cut them to size
  • Cardboard for the front and back cover
  • Fabric
  • String or ribbon
  • Hole Punch
  • Glue

Cut your inside pages to your desired size.
Hole punch your pages – I used a micro hole puncher. Cut out your front and back cover and hole punch the cardboard. Cover your front and back cover with fabric of your choice. I used Tacky Glue.
At this point, I marked the position of the holes on the fabric so I would be able to thread the string through.
Add an inside cover piece of paper to cover your raw fabric edges.
Place the front and back covers under heavy books so they will dry completely flat. (I covered them in wax paper so the glue would seep out and get onto the books).


Assemble your book and tie together with string or ribbon.

This project was easier than I expected so with my new confidence, I may try an accordion style book next. Stay tuned.


Friday, October 22, 2010

Etceteras: paper flower tacks

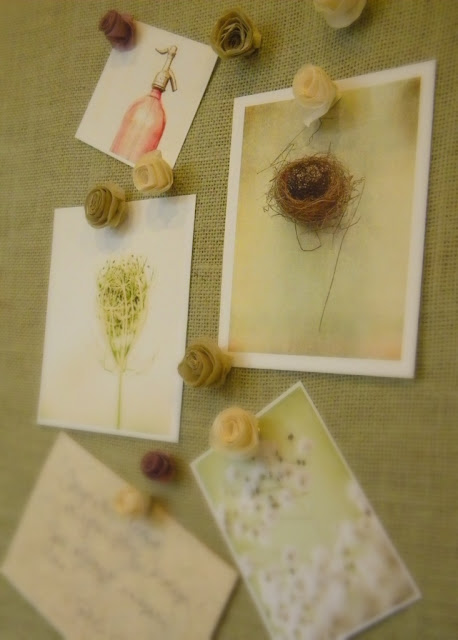
I received so many nice comments on the paper flower wreath that I made, that I was inspired to make more paper flowers. I also saw an amazing inspiration board on The Willows and knew exactly how I wanted to use my paper flowers.

Paper flower tacks - so pretty and delicate. All you need to do is make your paper flowers and glue them onto a thumb tack. You can find the paper flower tutorial here.
 
You have to be a little careful pushing them into your bulletin board because the flower is so delicate.

But like all pretty, delicate flowers, they’re worth it.

Thursday, October 21, 2010

Inkling: security envelope art

Here’s another fun project you can do with the envelopes you get with junk mail and bills. Before throwing out any envelopes, check the inside of the security envelopes. Many of these envelopes have amazing patterns that can be used for a variety of crafts – cards, gift tags, even framed art.


For the tree, I used security envelope paper with a floral design for the leaves and a wood grain pattern for the trunk and branches.

 
I used the same wood grain for the bird’s nest and a blue speckled pattern for the eggs.


The birds on a wire were made with a few different patterns for the birds and lined paper for the wire.

So don’t throw out junk mail or bill envelopes before checking the insides. Just don’t forget to pay those darn bills.

Wednesday, October 20, 2010

Sew and Tell: thanksgiving napkin rings

I haven’t decided how I want my Thanksgiving table to look. Should I go with a more formal look with a white crisp tablecloth or a colorful and casual feel?

I made two sets of napkin rings and I’ll need to decide which ones I’m going to use.

 
For the first set I used a brown pinstripe suiting fabric for a tailored look.

The second more casual set was made with a beige cotton fabric.


Napkin rings are easy to make and can be just the finishing touch for your place settings. All you need are paper towel or bathroom tissue rolls, fabric and embellishments.

  1. Cut your paper towel rolls – I cut mine to 1-1/4”.
  2. Cut out a piece of fabric long enough to wrap around the roll and wide enough to tuck into the inside of the roll.
  3. Mine measured 2-3/4” x 5-1/2”.
  4. Glue your fabric onto the roll with fabric or craft glue. 

Add your embellishments and let dry.


 I still have to decide which set I’m going to use but deciding how to set your table is part of the fun. 


Visit thecsiproject.com

Tuesday, October 19, 2010

Etceteras: halloween cake stands

I was inspired by these kirigami cut outs. They’re so pretty and each one is like a snowflake – unique. You can find these on the blog Omiyage.

I’m going to try to make some pretty flowers and snowflakes with colorful paper but in the meantime, I thought I could use this same process to make spider webs for Halloween. I used baking parchment paper to make spider web doilies to serve up Halloween treats.

The two smaller cake stands are small plates on top of candle holders. I’m sure you’ve seen this done before. Search the blogs and you’ll find some amazing cake stand creations. Just make sure you securely glue the plate to the candle holder.


For the large cake stand, I simply cut out a piece of black and white fabric with pinking shears.


Touches of color with an orange gros rain ribbon or fall candle and you have a simple Halloween treat display.

Now I need to go bake some treats to put on those empty plates.